Understanding Your Tevo Tarantula and Cura
Embarking on your 3D printing journey with the Tevo Tarantula and Cura slicing software can be an incredibly rewarding experience. This guide is designed to provide you with a comprehensive walkthrough of the setup process, ensuring that you can get your 3D printer up and running smoothly. The Tevo Tarantula is a popular choice for beginners and hobbyists alike, known for its affordability and ease of assembly. Cura, on the other hand, is a powerful and user-friendly slicer that translates your digital designs into instructions for the printer to follow. This combination offers a fantastic entry point into the world of 3D printing, allowing you to bring your ideas to life with relative ease. This guide covers everything from downloading and installing Cura to optimizing your print settings and troubleshooting common issues, allowing you to quickly achieve high-quality prints.
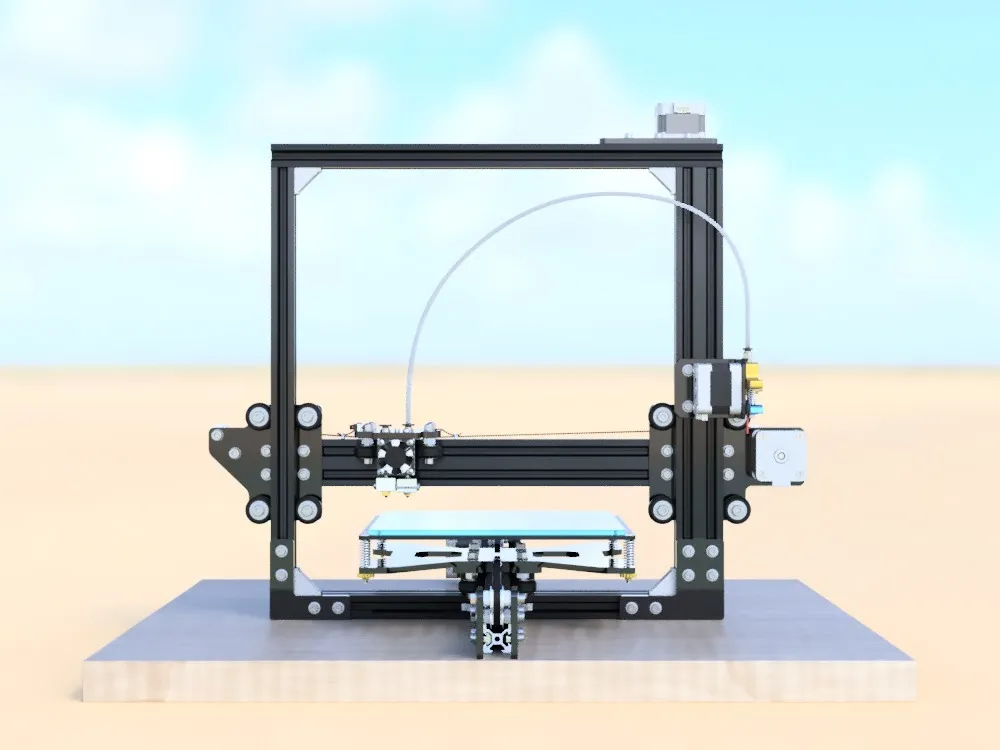
The Tevo Tarantula Printer [Overview]
The Tevo Tarantula is a DIY 3D printer kit that offers a great balance of features and cost. It features a decent build volume, allowing you to print a variety of objects, from small figurines to larger functional parts. The printer utilizes a Cartesian design, which is common among desktop 3D printers, providing a familiar and relatively easy-to-understand movement system. It typically comes with a heated bed, which is crucial for printing with materials like ABS and PETG, as it helps to prevent warping. The frame is usually constructed from aluminum extrusions, providing a stable and rigid platform for printing. Furthermore, the open-source nature of the printer allows for easy customization and upgrades, enabling you to enhance its performance and capabilities as your skills grow. The Tarantula’s accessible design makes it a perfect platform for learning and experimenting with 3D printing.
Cura Slicing Software [Introduction]

Cura is a free, open-source slicing software developed by Ultimaker. It plays a vital role in the 3D printing process by converting your 3D models (usually in STL or OBJ format) into G-code, the language that your 3D printer understands. Cura’s user-friendly interface, combined with its powerful features, makes it an excellent choice for both beginners and experienced users. The software offers a wide range of settings to control every aspect of the printing process, from layer height and infill density to print speed and temperature. Cura also supports a vast array of 3D printer models and materials, making it versatile for various printing projects. The ability to preview your model with different settings before printing helps to avoid costly mistakes and optimize your prints. Additionally, Cura’s active community and extensive documentation make it easy to find solutions and learn new techniques, ensuring that you get the most out of your 3D printer.
Downloading and Installing Cura for Tevo Tarantula
Before you can start printing, you’ll need to download and install Cura on your computer. This process is straightforward and relatively quick. Ensuring that you have the correct version of Cura and that it’s compatible with your operating system is important. Typically, Cura is available for Windows, macOS, and Linux, so compatibility is usually not an issue. The official Ultimaker website is the best source for the latest version of the software, and it’s crucial to avoid downloading from unofficial sources to prevent potential security risks. Once you have the installer file, you can proceed with the installation process, which generally involves accepting the terms of service and choosing a destination folder.
Downloading Cura
Visit the Ultimaker website to download the latest version of Cura. Make sure to select the version compatible with your operating system. The download process is usually quick, and the installer file is typically small.
Installing Cura

Double-click the downloaded file to begin the installation. Follow the on-screen instructions, accepting the terms and conditions and choosing a suitable installation location. The installation process may take a few minutes to complete.
Configuring Cura for Tevo Tarantula
After installing Cura, the next step is to configure it for your Tevo Tarantula 3D printer. This involves adding your printer to Cura’s settings and specifying the appropriate settings for your specific printer model. This ensures that Cura correctly generates the G-code for your printer. This includes setting up the printer’s build volume, nozzle size, and other important parameters. Accurate printer configuration is essential for achieving successful prints. Failing to configure your printer correctly will lead to problems such as incorrect model scaling, poor print quality, and potential damage to your printer.
Adding Your Printer
When you first open Cura, it will prompt you to add a printer. You can search for “Tevo Tarantula” in the printer list or manually enter the printer’s specifications. Make sure to select the appropriate printer model or the closest match, if your specific model isn’t listed. If manual configuration is required, you’ll need to input the build volume dimensions (usually 200x200x200 mm), nozzle diameter (typically 0.4 mm), and other relevant settings.
Setting Up the Print Bed

Ensure that the virtual print bed in Cura matches the physical dimensions of your Tevo Tarantula’s print bed. This includes specifying the X, Y, and Z dimensions. Proper bed setup guarantees your models fit within the printable area and avoids collisions with the printer frame or other components. You also need to ensure that the origin point (0,0,0) is correctly defined in Cura, which usually defaults to the front-left corner of the bed. You can also adjust the virtual print bed to account for any modifications or upgrades made to your printer.
Nozzle and Filament Settings
In the settings, specify your nozzle diameter, which is usually 0.4mm for the Tevo Tarantula, but it can vary depending on your installed nozzle. Selecting the correct nozzle size affects the resolution and print time of your models. Next, you must select the correct filament type (PLA, ABS, PETG, etc.). Choosing the correct filament type allows Cura to adjust print settings such as temperature and bed adhesion. If you are using a filament type that is not pre-defined in Cura, you will need to manually enter the filament’s printing temperature. The filament profile is also essential for achieving high-quality prints.
Essential Cura Settings for Quality Prints
Cura offers a wide range of settings that affect print quality. Understanding these settings and how they influence the printing process is crucial. Layer height, print speed, temperature, supports, and infill are some of the primary settings that you will often adjust to optimize your prints. Experimenting with these settings, along with understanding their impact, will ultimately improve your prints. Fine-tuning your settings for different filaments, models, and printer conditions enables you to achieve the desired results. Remember to save your settings as profiles for future prints to easily replicate successful results.
Print Speed Settings

Print speed greatly affects print time and quality. For the Tevo Tarantula, a print speed of 50-60 mm/s is a good starting point for PLA. Reducing the print speed often improves the print quality, especially for intricate details. Increase the print speed if you prioritize print time over quality, however, be aware that faster print speeds may lead to issues such as layer shifting or under-extrusion. Carefully consider the balance between speed and print quality depending on the specific requirements of each print.
Temperature Settings [Nozzle and Bed]
Nozzle and bed temperatures are critical for successful printing. The ideal nozzle temperature depends on the filament type. PLA typically prints well at 190-220°C, while ABS requires a higher temperature (230-250°C). The bed temperature is crucial for adhesion; PLA often requires a bed temperature of 60°C, and ABS usually benefits from a bed temperature of 100-110°C. Improper temperature settings can lead to issues like warping, poor layer adhesion, and nozzle clogging. Refer to the filament manufacturer’s recommendations and fine-tune your temperature settings for the best results, taking into consideration your printing environment and printer components.
Support Settings
Support structures are necessary for printing overhangs and complex geometries. In Cura, you can choose from various support options, including support type (e.g., touching build plate, everywhere), overhang angle, and support density. These settings determine where and how support structures are generated. Using supports increases the print time and requires additional post-processing to remove them. Properly configured supports prevent drooping and ensure the structural integrity of your prints. Experiment with different support settings to find the best balance between support material usage and print quality, ensuring that supports are easy to remove and leave a clean surface finish.
Infill Settings

Infill determines the internal structure of your prints. The infill density (percentage) affects the strength, weight, and print time of your models. Common infill patterns include lines, grid, and gyroid. Choosing the right infill density and pattern depends on your model’s requirements. A higher infill density provides more strength but increases print time and material usage. The infill pattern can also affect the model’s performance, with gyroid being a popular choice for its strength and efficiency. Consider the functional requirements of your print and choose the appropriate infill settings accordingly.
Optimizing Cura Profiles for Tevo Tarantula
Creating and saving custom profiles in Cura allows you to quickly load your preferred settings for different filaments and print types. Once you’ve found settings that produce good results, save them as a profile. This will save you time and ensure consistency across your prints. Regularly review and refine your profiles as you gain experience. It’s helpful to organize your profiles by filament type and print requirements. This helps to streamline your workflow and guarantees optimal printing performance. Maintaining well-organized profiles also makes it easier to troubleshoot and improve print results.
Fine-Tuning Print Settings
Fine-tuning your print settings is an iterative process. Start with the default settings and then adjust them based on the results. Use test prints like the calibration cube or a benchy to evaluate your settings. Make small adjustments and observe the results. Keep track of your changes and the corresponding effects on print quality. Fine-tuning can improve print quality and efficiency, allowing you to get the best performance out of your Tevo Tarantula. Regularly check the printer’s hardware condition and software settings to get the best results.
Troubleshooting Common Printing Issues

Even with the best setup, you might encounter printing issues. Knowing how to troubleshoot these problems can save you time and filament. Common issues include adhesion problems, nozzle clogging, and layer shifting. When a print fails, carefully observe the issues before attempting to troubleshoot. Keep track of the changes to the setup and the effects on print quality. Consider documenting the troubleshooting process for future reference. Many of the problems in 3D printing are related to one another, so a comprehensive troubleshooting approach is necessary.
Adhesion Problems
Poor bed adhesion is a common issue, leading to the print detaching from the bed. This can be caused by a variety of factors. Ensure the bed is clean, level, and the correct temperature. Use adhesion aids such as glue stick or painters tape. Adjust the first layer height or bed temperature settings to improve adhesion. For some filaments, a brim or raft can help to hold the print firmly to the bed during the entire printing process.
Nozzle Clogging
Nozzle clogging can interrupt the extrusion of filament. This often leads to print failure. Check your nozzle temperature, and make sure it is properly calibrated for the type of filament you are using. Clean the nozzle using a needle or a cold pull. Regularly check and clean the nozzle. Preventative measures include using clean filament and ensuring the filament is dry. Regularly clean your nozzle to eliminate the possibilities of future problems.
Layer Shifting

Layer shifting results in misalignment of layers. This can be due to various mechanical or electrical issues. Check the belts for tension and make sure the motor cables are secure. Reduce the print speed and acceleration settings to prevent layer shifting. Ensure the printer is on a stable surface. Tighten the set screws on your stepper motor pulleys. Regular maintenance can help prevent layer shifting. Also, make sure there is nothing obstructing the movement of the print head.
Advanced Cura Techniques for Tevo Tarantula
Once you have mastered the basics, explore advanced Cura techniques to enhance your prints. This can involve experimenting with custom profiles, and specific settings adjustments. Diving into advanced features takes some time, but it can help you elevate your skills to make better prints. The ability to create custom profiles means you can save a variety of settings that can be recalled at any time. Using these techniques is a key element in 3D printing.
Using Custom Profiles
Creating custom profiles allows you to fine-tune settings for specific filaments or print requirements. This enables you to optimize your print quality and printing workflow. Experiment with various settings, and then save your favorite configuration for future use. When saving a profile, always include a description of the settings. Make sure the profile is well-documented to make it easy to recall and understand. This saves time and ensures that your prints are reproducible.
Post-Processing Your Prints
After your print is complete, some post-processing is usually required. This involves removing support structures, trimming any excess material, and smoothing the surface of your prints. The type of post-processing depends on the model and the filament used. Various tools and techniques can be used, such as sanding, painting, and assembling parts. Post-processing enables you to achieve the final appearance and functionality of your prints. Once your print is complete, you can move onto the final stages and add the finishing touches.
Where to Find More Information and Support
There is a wealth of resources available to assist you in your 3D printing journey. The official Cura website offers documentation and tutorials. Online communities and forums provide a platform for you to connect with other 3D printing enthusiasts. There you can ask questions, share your projects, and receive feedback. YouTube channels and online courses offer detailed tutorials and guides. These resources can provide valuable insights and troubleshooting tips. The combination of online resources and a supportive community helps you succeed in the world of 3D printing.