How to Take Stunning Tarantula Pics
Capturing breathtaking pics of tarantulas requires more than just pointing and shooting. It demands patience, technical skill, and a good understanding of the subject. These fascinating creatures, with their intricate details and diverse appearances, offer a unique challenge and reward for photographers. This guide will walk you through essential equipment, lighting techniques, composition strategies, and post-processing tips to help you capture stunning shots of these amazing arachnids. Whether you’re a seasoned photographer or a beginner, you’ll find valuable insights to improve your tarantula photography skills and create images that truly stand out. Get ready to delve into the world of tarantula photography and elevate your photography game!
Essential Equipment for Tarantula Photography
The right equipment is fundamental to success in tarantula photography. This includes a camera capable of capturing detailed images and a selection of lenses suited for macro and close-up photography. Also consider tripods for stability and external lighting solutions to control light and shadow. Investing in quality equipment ensures sharp, well-lit images that showcase the tarantula’s unique characteristics. Additionally, a macro lens is indispensable for capturing the fine details of these spiders, while a sturdy tripod eliminates camera shake, especially crucial for close-up shots. Proper lighting enhances the image quality and brings out the vibrant colors and textures. A well-equipped photographer is well-prepared to capture the best images possible.
Camera Choices and Settings

Choose a camera with excellent image quality and manual control features. DSLR and mirrorless cameras offer superior flexibility with interchangeable lenses and manual settings, giving you control over aperture, shutter speed, and ISO. Set your camera to RAW format to capture all image data, providing greater flexibility in post-processing. Experiment with different aperture settings to control the depth of field; a narrow aperture (high f-number) keeps more of the tarantula in focus. Shutter speed is crucial in maintaining sharp images; use a fast shutter speed to freeze motion or a slower shutter speed with a tripod for static shots. High ISO can lead to noise, so use the lowest ISO possible while maintaining proper exposure.
Lens Selection for Tarantula Pics
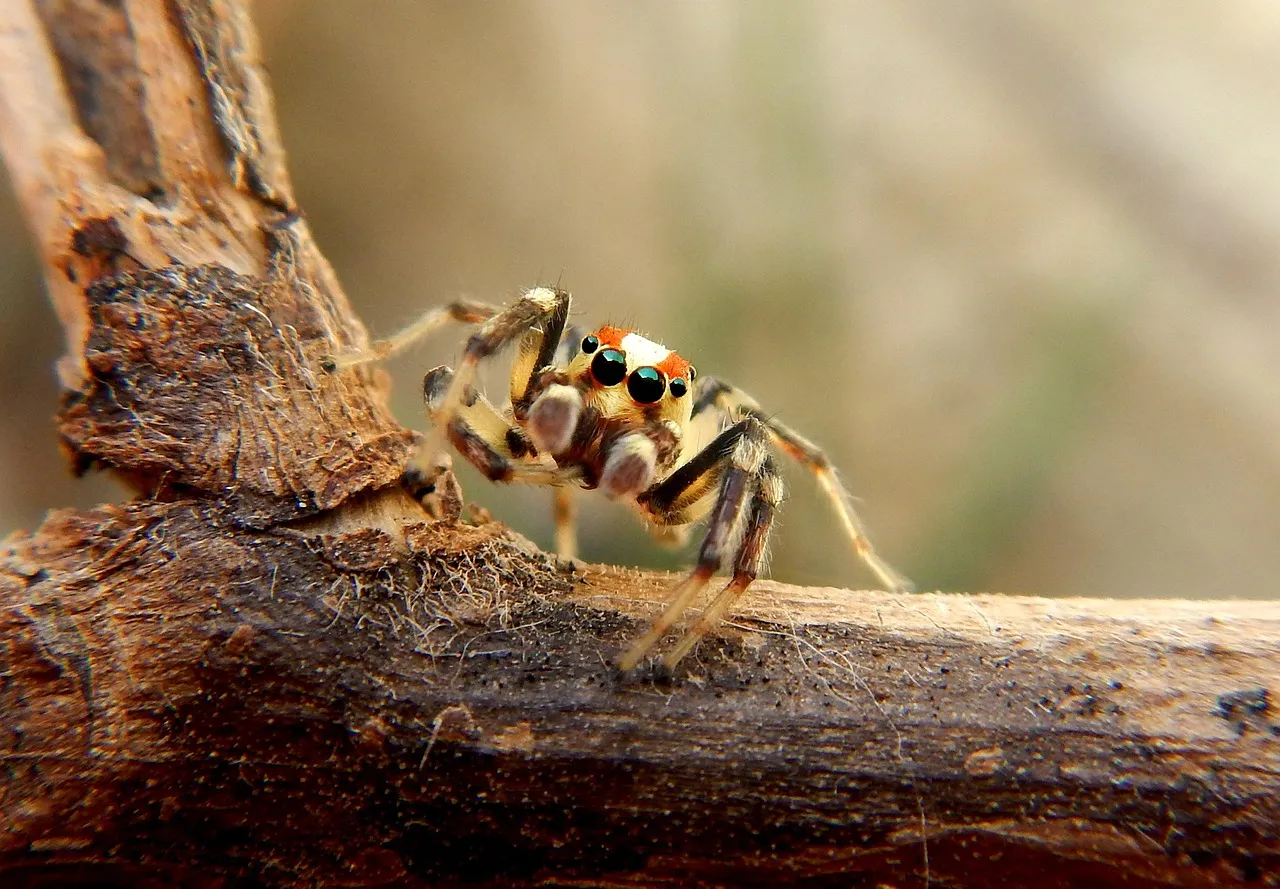
A macro lens is indispensable for capturing the fine details of tarantulas. Macro lenses typically offer a 1:1 magnification ratio, allowing you to fill the frame with the spider’s intricate features. Consider a lens with a focal length of 90mm to 105mm; these provide a comfortable working distance between you and the subject, reducing the risk of startling the tarantula. For wider shots, a standard lens can be used, but remember that macro lenses excel at capturing detail. Pay close attention to the lens’s minimum focusing distance; this will determine how close you can get to the tarantula. A high-quality macro lens will ensure your pics of tarantulas are incredibly sharp and detailed.
Lighting Techniques for Tarantula Photos
Proper lighting is crucial for bringing out the vibrant colors and textures of tarantulas. The goal is to illuminate the subject evenly, minimize harsh shadows, and create a visually appealing image. This can be achieved through a combination of natural and artificial light sources. Soft, diffused light is best. This prevents harsh shadows that can obscure the tarantula’s features. Direct sunlight can create strong shadows, so shooting in overcast conditions or using a diffuser is recommended. Artificial light sources, such as flashes and LED panels, offer greater control over the lighting conditions and allow you to manipulate light direction and intensity, helping you create the perfect pics of tarantulas.
Natural Light vs. Artificial Light

Natural light, particularly during the golden hours (shortly after sunrise or before sunset), provides warm, soft light that can enhance the colors and details of your tarantula. However, natural light is often inconsistent and depends on weather conditions. Artificial light offers greater control and is necessary for indoor photography or when natural light is unavailable. Speedlights (flashes) can freeze motion and add brightness, while LED panels offer continuous, adjustable light. Diffusers and reflectors can further soften the light and reduce harsh shadows. Experimenting with different lighting setups will help you find the optimal way to illuminate your tarantula subjects and capture the best pics.
Setting up a Photo Studio
Setting up a small studio allows you to control the environment and lighting for tarantula photography. This is especially useful for indoor shots, where you can manage the conditions and ensure consistent results. The setup requires a clean backdrop, good lighting, and a stable surface. A simple setup includes a light tent or diffusion panels to soften the light, and a neutral background, like a white or black sheet of paper. Use a tripod to eliminate camera shake and ensure sharpness. Place the tarantula in a suitable enclosure or on a safe surface, and arrange your lighting to achieve the desired effect. This setup offers complete control over every aspect of the shot and is perfect for capturing detailed pics of tarantulas.
Composition and Framing your Tarantula Shots
Effective composition is key to creating visually appealing tarantula photos. The way you frame your subject can significantly impact the viewer’s perception and the overall impact of the image. Consider the placement of the tarantula within the frame, the background, and the use of lines, patterns, and negative space to create a balanced and engaging composition. Experiment with different angles, from eye-level shots to low-angle perspectives. This will make the tarantula appear more imposing. Always make sure the spider is the focal point. A well-composed photo guides the viewer’s eye and tells a story. The goal is to capture unique pics of tarantulas that stand out.
Rule of Thirds and other Composition Tips

The rule of thirds is a fundamental principle in photography. It involves dividing the frame into nine equal parts using two horizontal and two vertical lines. Place the main subject at the intersection of these lines or along the lines themselves to create a more visually interesting composition. Also consider leading lines, which guide the viewer’s eye through the image. Use patterns and textures to add visual interest, and be mindful of negative space, which provides breathing room and enhances the impact of the subject. Symmetry can be effective, especially when showcasing the symmetry of the tarantula itself. Applying these tips can enhance your pics of tarantulas by creating a more balanced and engaging viewing experience.
Backgrounds and Props for Tarantula Pics
The background can either enhance or detract from your tarantula photos. Choose a background that complements the subject without being distracting. Solid colors, such as black or white, are often ideal. They prevent competing elements from stealing attention away from the tarantula. Consider using natural elements, like leaves, wood, or small rocks, to create a natural environment. Be mindful of the depth of field; a shallow depth of field will blur the background, isolating the tarantula and making it the primary focus. Props can add context and interest to your photos. They can showcase the tarantula’s size, habitat, or behavior. However, always prioritize the safety and well-being of the tarantula. Use props responsibly and ethically.
Focusing Techniques for Sharp Tarantula Pics
Achieving sharp focus is essential for capturing detailed and stunning pics of tarantulas. Accurate focus ensures that the tarantula’s intricate features are visible and the image is visually appealing. Mastering the correct focus techniques is crucial for any aspiring tarantula photographer. This includes understanding the differences between manual and autofocus, and how to manage depth of field effectively. Sharpness is paramount; blurry images can be frustrating. Practice focusing techniques and understand how different settings affect the outcome. With the right techniques, you can capture highly detailed and impressive pics of tarantulas.
Manual Focus vs. Autofocus

Manual focus is often preferred for tarantula photography, especially when using macro lenses. This allows you to precisely control the focus point and ensure sharpness where it matters most. Autofocus can struggle with small, detailed subjects and may hunt for focus, especially in low light. To use manual focus, switch your lens to MF mode and use the focus ring to adjust the focus until the subject appears sharp in the viewfinder. Practice makes perfect. In some situations, autofocus can be useful; using single-point autofocus mode and focusing on the spider’s eyes can work well. Regardless of the method, always check your focus by zooming in on the image preview to ensure critical details are sharp in your pics.
Depth of Field Considerations
Depth of field refers to the range of distances in your image that appear acceptably sharp. In macro photography, depth of field is often very shallow. This can make it challenging to get the entire tarantula in focus. A narrow aperture (high f-number, like f/16 or f/22) increases the depth of field, but it can also reduce the amount of light reaching the sensor, potentially requiring a slower shutter speed. Experiment with different apertures to find the right balance between sharpness and exposure. Focus stacking can be used to overcome the challenges of shallow depth of field. This involves taking multiple photos at different focus points and merging them in post-processing to create an image with a greater depth of field. Mastering depth of field is key to capturing amazing pics of tarantulas.
Post-Processing and Editing Tarantula Photos
Post-processing plays a crucial role in refining your tarantula photos. It allows you to adjust exposure, contrast, colors, and details to create the best possible image. While capturing a good image in-camera is important, post-processing can help enhance the image and correct any imperfections. Editing can transform a good photo into an exceptional one. Consider this stage as the final step in the process. Whether you’re using professional software or a mobile app, post-processing offers powerful tools for improving your pics of tarantulas. Correcting exposure, adjusting contrast, and enhancing colors will significantly enhance the final image.
Editing Software and Techniques

Various software options are available for editing your tarantula photos. Adobe Lightroom and Photoshop are industry standards, offering a wide range of tools and features. Free alternatives like GIMP and Darktable can also deliver excellent results. Start by adjusting basic settings such as exposure, contrast, highlights, shadows, whites, and blacks. Use the color adjustment tools to enhance the colors of the tarantula, making them more vibrant and realistic. The clarity and sharpness sliders can be used to enhance details, but use them cautiously to avoid over-sharpening. Experiment with noise reduction to remove any unwanted grain, especially in photos taken at high ISO settings. Remember to work non-destructively, meaning you can always revert to the original image if needed.
Enhancing Colors and Details
Enhancing colors and details is a significant part of post-processing, bringing your tarantula photos to life. Use the color adjustment tools to fine-tune the hues, saturation, and vibrance. Increase saturation and vibrance to make the colors pop, but avoid overdoing it. Over-saturation can lead to unnatural-looking images. Detail enhancement tools can bring out the intricate patterns and textures of the tarantula. Use the clarity and sharpness sliders to add detail, but be careful not to over-sharpen. Over-sharpening can create unwanted artifacts. Local adjustments, such as using the brush tool to selectively enhance certain areas, can be very effective. Experiment with different techniques to find what works best for your images and your pics of tarantulas.
Common Mistakes to Avoid in Tarantula Photography
Avoiding common mistakes will significantly improve your tarantula photography. It’s essential to understand the pitfalls and take measures to prevent them. This involves everything from lighting and focus to composition and post-processing. Be aware of the common issues photographers face and make a conscious effort to correct them. Paying attention to these mistakes can save you time and increase the quality of your work. By learning from these common pitfalls, you can improve your skills and create better pics of tarantulas.
Poor Lighting and Overexposure

Poor lighting is a frequent mistake, resulting in harsh shadows or underexposed images. To avoid this, use soft, diffused lighting, especially when shooting indoors. Natural light is often best, but you can create soft light using diffusers and reflectors. Avoid direct sunlight, which can create harsh shadows. Overexposure can wash out the colors and details of the tarantula. Use a light meter to ensure proper exposure, and check the histogram to monitor the highlights. Adjust your camera settings, such as aperture, shutter speed, and ISO, to achieve the correct exposure. Correcting lighting and exposure is crucial for capturing well-exposed and visually appealing pics of tarantulas.
Blurry Photos and Improper Focus
Blurry photos and improper focus are common problems in macro photography. To minimize blur, use a tripod to stabilize your camera and reduce camera shake, especially at slower shutter speeds. Ensure your subject is sharply in focus. Use manual focus to have precise control, and double-check the focus in the viewfinder or on the LCD screen by zooming in. Consider using a focus-stacking technique to increase the depth of field and ensure that the entire tarantula is in focus. Proper focus ensures that your pics of tarantulas are sharp and detailed, highlighting the intricate features of the subject. Avoid blurry photos by focusing carefully and using a tripod.