
Tarantula Crochet Patron: 5 Top Tips
Crocheting a tarantula can be an incredibly rewarding project, allowing you to create a unique and quirky plushie. However, like any detailed crochet project, success depends on careful planning and execution. Here are five top tips to guide you through the process, ensuring your tarantula crochet patron turns out as realistic and adorable as possible. From selecting the right materials to mastering the necessary techniques, these tips will help you create a truly impressive finished product. Whether you are a beginner or an experienced crocheter, these insights will enhance your skills and bring your crocheted tarantula to life. Get ready to embark on a fun and creative journey!
Choose the Right Yarn for Your Tarantula Crochet
The choice of yarn significantly impacts the final appearance and texture of your crocheted tarantula. Consider the desired look and feel of your spider. For a realistic, fuzzy texture, choose a yarn with some texture, like a boucle or a brushed yarn, which can mimic the tarantula’s hairy appearance. For a smoother, more polished look, a worsted weight or DK weight yarn in a solid color will work well. Think about the color, too! A variety of brown, black, and even some unique color combinations can make your tarantula stand out. Furthermore, yarn selection affects the final size and drape of your creation, so make sure your choice aligns with your pattern’s instructions and desired outcome. Also, remember that the yarn’s fiber content will affect how easy it is to care for your finished tarantula, so weigh the options of natural fibers, synthetic, or a combination of both.
Consider Yarn Weight and Fiber Content

Yarn weight is crucial. Lighter weight yarns, like DK or sport weight, will result in a smaller, more detailed tarantula, while bulkier yarns will create a larger, cuddlier one. The fiber content of the yarn will also influence the outcome. Acrylic yarns are durable, easy to care for, and come in a wide array of colors. Cotton yarns offer excellent stitch definition and are great for creating crisp details. Wool yarns can provide a rustic, textured finish and offer more warmth, but may require more careful handling. Blends of different fibers can provide a mix of benefits. Selecting a yarn with the right combination of these factors is vital for the success of your project. Always refer to the pattern’s recommendations to avoid any problems with the final result.
Select the Appropriate Crochet Hook
The correct crochet hook size is essential for achieving the right tension and stitch definition for your tarantula. The hook size should match the yarn weight you’ve chosen. Too large a hook will result in a loose, saggy fabric, while too small a hook can make the fabric stiff and difficult to work with. Generally, patterns will recommend a specific hook size. If your tension tends to be tight or loose, adjust the hook size accordingly. For instance, if you crochet tightly, go up a hook size to loosen your stitches. Using a hook size that is suitable for the yarn weight and your personal tension will ensure your tarantula’s structure is well-defined and the stuffing doesn’t peek through. Having a variety of hook sizes on hand is always a good idea, just in case you need to adjust. Remember to check the yarn label for hook recommendations.
Understand Crochet Stitches
A good understanding of fundamental crochet stitches is necessary for crafting a tarantula. Familiarize yourself with the single crochet stitch, which is the most common stitch used in amigurumi projects. The single crochet stitch creates a tight, dense fabric, perfect for holding the stuffing. Knowing how to increase and decrease stitches is equally important for shaping the body, legs, and other parts of the tarantula. Learn the slip stitch for joining rounds, creating neat edges, and adding details. You might also need to know half double crochet, double crochet, or treble crochet for specific design elements. Practicing these stitches beforehand ensures a smooth crocheting process. Moreover, understanding the basic principles will enable you to troubleshoot any issues that arise during the project, allowing you to improvise as needed. Don’t be afraid to refer to tutorials or practice swatches.
Mastering Basic Stitches for Your Tarantula
Mastering the single crochet stitch, the foundation of most amigurumi projects, is vital for a well-crafted tarantula. Ensuring your tension is consistent is crucial; maintaining a consistent stitch size throughout the project leads to an even fabric that holds its shape. Practice making increases (two single crochet stitches in one stitch) and decreases (single crochet two stitches together) correctly. These techniques are crucial for shaping the body, head, and legs of your tarantula. Pay attention to the placement of your stitches to avoid gaps or holes that could let the stuffing escape. Using a stitch marker to identify the beginning of each round helps to keep track of your progress and avoid mistakes. Constant practice of these basic stitches will ensure the quality of your tarantula.
Advanced Stitches to Elevate Your Tarantula
Once you’ve mastered the basics, you can use advanced stitches to enhance the detail and realism of your tarantula. The half double crochet and double crochet stitches can add texture and depth to the tarantula’s body. The use of post stitches, where you work around the post of a stitch from the previous row, can create textured patterns that mimic the spider’s hairy appearance. For a more realistic look, consider employing techniques like the invisible decrease for seamless shaping. Furthermore, consider using color changes effectively to create patterns or markings on your tarantula. Experimenting with these advanced stitches and techniques will take your tarantula from simple to stunning and will allow you to add unique details that elevate your finished product. Don’t be afraid to test new techniques on a small swatch before incorporating them into the main project.
Get a Tarantula Crochet Pattern
Choosing the right crochet pattern is a crucial first step. Look for patterns that offer clear instructions, detailed photos, and are well-written for your skill level. Patterns range in complexity from beginner-friendly to advanced, so select one that suits your abilities. Read reviews to understand the pattern’s reputation and clarity. Patterns may include different sizes, styles, and levels of detail, so consider what features are most important to you. Free patterns are available, but paid patterns often provide more detail and support. Many online platforms, such as Ravelry and Etsy, offer a wide variety of patterns. Consider the designer’s experience and the pattern’s popularity when making your choice. Ultimately, a well-chosen pattern provides the road map for your crochet tarantula, making the entire process much more enjoyable and less stressful.
Find Reliable and Detailed Patterns

When searching for a pattern, focus on clarity and detail. A reliable pattern should have step-by-step instructions, accompanied by helpful illustrations or photos. Look for patterns that clearly describe the required stitches, hook size, yarn type, and any other necessary materials. Check for patterns that provide guidance on shaping, assembling, and finishing your tarantula. Clear instructions will minimize confusion and ensure a smoother crocheting experience. Furthermore, detailed patterns often include tips and tricks for achieving a professional finish, such as advice on how to weave in ends invisibly or how to attach different parts securely. Reading reviews from other crocheters can help you determine if the pattern is as detailed and reliable as advertised. Choose patterns that provide all the information you need to be successful.
Evaluate Pattern Complexity and Skill Level
Before you start, assess the pattern’s complexity to ensure it aligns with your skill level. Beginner patterns will typically involve basic stitches, simple shapes, and minimal assembly. Intermediate patterns may include more complex stitch combinations, shaping techniques, and detailed color changes. Advanced patterns may challenge you with intricate designs, multiple parts, and advanced techniques. Carefully examine the pattern’s instructions to get a sense of its intricacy. Consider whether you are comfortable with techniques such as increasing, decreasing, changing colors, or working in the round. If you’re a beginner, starting with an easy pattern is a good idea to build confidence. However, don’t be afraid to challenge yourself as your skills improve. Understanding the complexity will help you manage your expectations and enjoy the creative process.
Assemble Your Tarantula Crochet
The assembly phase brings all the crocheted components together. This usually involves sewing the different parts of your tarantula together, like the head, body, legs, and any other added features. Use a yarn needle and the same yarn you used for the project to sew the pieces together, as this will help the seams blend in. Pin the pieces in place before sewing to ensure proper alignment. When sewing, use a whip stitch or a similar stitch to join the pieces seamlessly. Take your time, and ensure all the parts are securely attached, as this will ensure the durability of your plush. Also, make sure that the right sides of your crochet pieces are facing outwards, as this will give you a finished look. Careful assembly is key for a polished and professional-looking tarantula.
Stuffing and Shaping Your Crochet Tarantula

Stuffing your tarantula determines its final shape and plushness. Use a suitable stuffing material, such as polyester fiberfill, and insert it into the various body parts as you sew them together. Stuffing should be firm enough to maintain the shape but not so tight that it distorts the fabric. Use small amounts of stuffing at a time, and evenly distribute it throughout the different sections. Pay special attention to the head and body, ensuring they are adequately filled. You may need to use a stuffing tool (like a chopstick or the end of a crochet hook) to push the stuffing into tight corners and small areas. Once stuffed, carefully shape the body parts to ensure a natural look. Adding more stuffing will give more form, so consider the balance between shape and firmness. The aim is to make the tarantula look plump and huggable.
Embellishing Your Tarantula Crochet
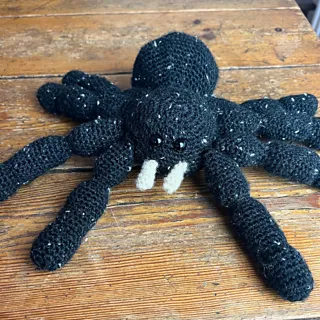
Embellishments add character and detail to your crocheted tarantula, bringing it to life. Consider adding safety eyes, which can be secured with washers for added safety and durability. Embroidering the mouth, fangs, and other facial features can greatly enhance the tarantula’s expression. Use different colors of yarn to create realistic patterns or markings. Consider adding small details such as tufts of yarn or faux fur to mimic the tarantula’s hairy appearance. Attaching small felt pieces for extra detail is another option. Think about the details you want to include to customize your spider. The embellishments will make your tarantula unique and appealing. Ensure that all embellishments are securely attached to avoid any safety hazards, especially if the tarantula is intended for a child.
Attach Legs and Other Details
Attaching the legs to your tarantula is crucial for completing its appearance. Crochet or knit the legs according to the pattern’s instructions. Use sturdy yarn and ensure the legs are firmly attached. When attaching the legs, position them in a way that gives your tarantula a stable stance. You can use pins to hold the legs in place before sewing them. Use the same yarn or a color that blends well with the body to sew the legs securely. The way you attach the legs will determine the tarantula’s ability to stand upright. Ensure the legs are evenly spaced and properly angled for stability. In addition, consider adding any other details outlined in your pattern, such as fangs or chelicerae, to give your tarantula a realistic look. Remember, take your time and ensure all parts are safely and securely attached.
Where to Find Inspiration

Finding inspiration can spark your creativity and help you create the perfect crochet tarantula. Browse online platforms such as Pinterest, Instagram, and Etsy to see what other crocheters are creating. Search for images of real tarantulas to observe their features, colors, and patterns. Visit craft stores, yarn shops, and local craft fairs for inspiration. Consider designing your own variations, experimenting with different yarn textures, colors, and stitch patterns. Remember that the goal is to create a unique piece that showcases your skills and reflects your creative vision. Drawing inspiration from various sources can provide you with ideas for your own designs. Don’t hesitate to mix and match ideas from different sources to add your own personal touch. Ultimately, the best way to find inspiration is to explore, experiment, and enjoy the creative process.